


How to Remove Background from Hair in Photoshop CC18
Instructions to Remove Hair from White Background in Photoshop CC18
Set up layers to alter hair on a white foundation
Secure your unique picture record
Make a high-contrast foundation
Eliminate the foundation from around the hair
Diminish Tolerance settings to eliminate low-contrast foundation regions
Eliminate the remainder of the foundation
Supplant the foundation
Stage 1: Set up layers to alter hair on a white foundation
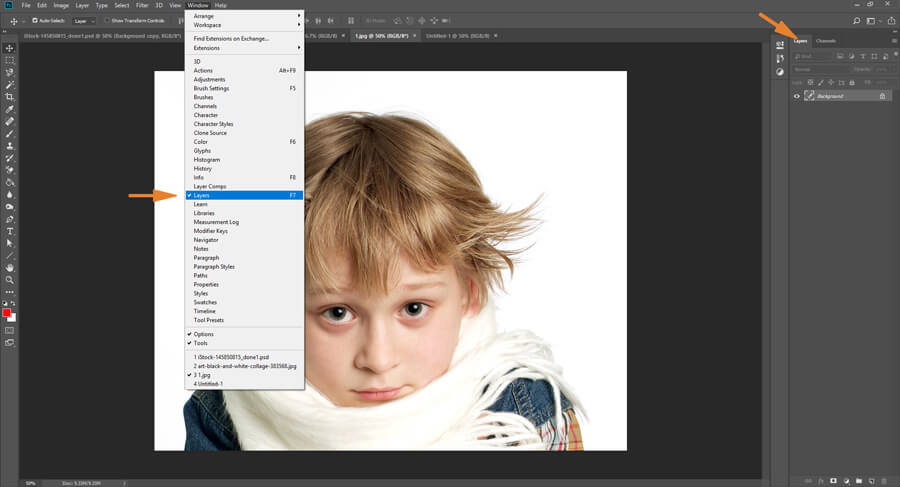
Ensure the layers board is open. Your screen should resemble this:
Set up layers to alter hair on a white foundation
Stage 2: Protect your unique picture document
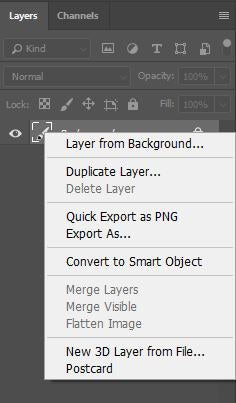
Copy your unique layer and afterward turn it off so you can undoubtedly begin again in the event that you commit an error. Right-click on the foundation layer in the layers board and snap Duplicate Layer...
Copy Layer
Then, click on the eye symbol close to the first layer to turn it off for the present.
click eye photoshop
Stage 3: Create a high-contrast foundation
Presently you'll have to add a striking tone to make it clear precisely the thing it is you're altering. Rather than basically utilizing a white foundation and eradicating around the edges, you can utilize a splendid shading that will show precisely which territories you have started to remove. This functions admirably if the first foundation you're working with is a light tone.
Whenever you've removed the picture and are prepared to place it into another foundation, you can dispose of this striking tone. Make another layer by tapping on the page symbol at the lower part of the layers board.
make high-contrast foundation
Utilize the Paint Bucket instrument to fill the new layer with a striking tone by clicking anyplace on the material, while the new layer is chosen.
paint can
Move the new shading layer under your copied photograph layer. It will vanish to the unaided eye, however it will in any case be there when you begin to alter the photograph. Simply intuitive it with your mouse.
layer 1
Related: Photoshop Tutorial: A Beginner's Guide to Using Layers
Stage 4: Remove the foundation from around the hair
Select the Background Eraser Tool from the devices board.
foundation eraser device
As this foundation is a strong shading, you'll need to utilize the Background Swatch testing technique and ensure the foundation tone is set to as near the fundamental foundation tone as could really be expected. For this situation, we have a strong white.
foundation pattern
Ensure Discontiguous and Protect Foreground Color are chosen. The Discontiguous setting keeps Photoshop from mixing the shading into the closer view, assisting you with keeping the two layers separate so you can carry on altering.
In any case, this doesn't generally chip away at its own, so by choosing the Protect Foreground Color, Photoshop will keep the two layers completely independent and ensure you don't unintentionally take out any of the first picture while you're removing the foundation.
discontiguous
The following settings will rely upon your picture. Start with the brush settings you see above and change them on the off chance that they don't exactly work for your model.
brush settings
The main setting here is Tolerance. This will tell the brush the differentiation limit of what to eliminate from your experience versus your forefront. In this model, since the kid has light earthy colored/blondish hair, we'll choose half. This should eliminate barely sufficient white while leaving the hair unblemished. You may need to explore different avenues regarding this setting to track down the correct equilibrium.
resistance balance
Utilizing the brush, cautiously delete where the hairline meets the foundation. Notice the red foundation appearing on the other side — this is the layer under that you made before. Likewise note the scarf in this model — the differentiation is far lower here, so we'll have to make a few acclimations to the brush settings first.
eradicate hairline foundation
Stage 5: Reduce Tolerance settings to eliminate low difference foundation regions
As should be obvious, the light-hued scarf is far nearer to the foundation tone than the hair, so we need to lessen the Tolerance setting to redress. For this situation, 5% functions admirably. We've likewise decreased the brush size down to 30 to give us more authority over the space we're altering.
bigger photoshop brush
Zoom into the better subtleties and cautiously eradicate around them utilizing your new settings. The key is to discover a harmony between the brush size and Tolerance for various spaces of your picture.
zoom eliminate hair foundation
Stage 6: Remove the remainder of the foundation

Since the better work is done, we can start eliminating the remainder of the white with half Tolerance and a bigger brush once more.
complete the process of eliminating foundation
Stage 7: Replace the foundation
With the difficult work presently complete, the record is prepared for you to supplant the red foundation with something more valuable.
new foundation
How Do You Refine Edges in Photoshop CC18?
images.google.de/url?sa=t&url=https%3A%2F%2Fimageworkindia.com
maps.google.de/url?sa=t&url=https%3A%2F%2Fimageworkindia.com
google.de/url?sa=t&url=https%3A%2F%2Fimageworkindia.com
maps.google.co.in/url?sa=t&url=https%3A%2F%2Fimageworkindia.com
images.google.co.in/url?sa=t&url=https%3A%2F%2Fimageworkindia.com
google.co.in/url?sa=t&url=https%3A%2F%2Fimageworkindia.com
maps.google.ru/url?sa=t&url=https%3A%2F%2Fimageworkindia.com
google.ru/url?sa=t&url=https%3A%2F%2Fimageworkindia.com
images.google.ru/url?sa=t&url=https%3A%2F%2Fimageworkindia.com
maps.google.pl/url?sa=t&url=https%3A%2F%2Fimageworkindia.com
google.pl/url?sa=t&url=https%3A%2F%2Fimageworkindia.com
images.google.pl/url?sa=t&url=https%3A%2F%2Fimageworkindia.com
google.com.au/url?sa=t&url=https%3A%2F%2Fimageworkindia.com
maps.google.com.au/url?sa=t&url=https%3A%2F%2Fimageworkindia.com
images.google.com.au/url?sa=t&url=https%3A%2F%2Fimageworkindia.com
images.google.com.tw/url?sa=t&url=https%3A%2F%2Fimageworkindia.com
google.com.tw/url?sa=t&url=https%3A%2F%2Fimageworkindia.com
maps.google.ro/url?sa=t&url=https%3A%2F%2Fimageworkindia.com
google.ro/url?sa=t&url=https%3A%2F%2Fimageworkindia.com
images.google.ro/url?sa=t&url=https%3A%2F%2Fimageworkindia.com
images.google.com.my/url?sa=t&url=https%3A%2F%2Fimageworkindia.com
maps.google.com.my/url?sa=t&url=https%3A%2F%2Fimageworkindia.com
google.com.my/url?sa=t&url=https%3A%2F%2Fimageworkindia.com
google.co.za/url?sa=t&url=https%3A%2F%2Fimageworkindia.com
images.google.co.za/url?sa=t&url=https%3A%2F%2Fimageworkindia.com
maps.google.co.za/url?sa=t&url=https%3A%2F%2Fimageworkindia.com
google.com.pk/url?q=httpss%3A%2F%2Fimageworkindia.com%2F
images.google.com.pk/url?q=httpss%3A%2F%2Fimageworkindia.com%2F
google.com.sg/url?sa=t&url=https%3A%2F%2Fimageworkindia.com
maps.google.com.sg/url?sa=t&url=https%3A%2F%2Fimageworkindia.com
images.google.com.sg/url?sa=t&url=https%3A%2F%2Fimageworkindia.com
google.com.sa/url?q=httpss%3A%2F%2Fimageworkindia.com%2F
google.cl/url?sa=t&url=https%3A%2F%2Fimageworkindia.com
images.google.cl/url?sa=t&url=https%3A%2F%2Fimageworkindia.com
maps.google.cl/url?sa=t&url=https%3A%2F%2Fimageworkindia.com
maps.google.ie/url?sa=t&url=https%3A%2F%2Fimageworkindia.com
google.ie/url?sa=t&url=https%3A%2F%2Fimageworkindia.com
images.google.ie/url?sa=t&url=https%3A%2F%2Fimageworkindia.com
google.sk/url?sa=t&url=https%3A%2F%2Fimageworkindia.com
maps.google.sk/url?sa=t&url=https%3A%2F%2Fimageworkindia.com
images.google.sk/url?sa=t&url=https%3A%2F%2Fimageworkindia.com
maps.google.co.kr/url?sa=t&url=https%3A%2F%2Fimageworkindia.com
google.co.kr/url?sa=t&url=https%3A%2F%2Fimageworkindia.com
images.google.co.kr/url?sa=t&url=https%3A%2F%2Fimageworkindia.com
images.google.by/url?q=httpss%3A%2F%2Fimageworkindia.com%2F
google.by/url?q=httpss%3A%2F%2Fimageworkindia.com%2F
maps.google.by/url?q=httpss%3A%2F%2Fimageworkindia.com%2F
images.google.bg/url?sa=t&url=https%3A%2F%2Fimageworkindia.com
google.bg/url?sa=t&url=https%3A%2F%2Fimageworkindia.com
maps.google.bg/url?sa=t&url=https%3A%2F%2Fimageworkindia.com
images.google.com.pe/url?sa=t&url=https%3A%2F%2Fimageworkindia.com
maps.google.com.pe/url?sa=t&url=https%3A%2F%2Fimageworkindia.com
google.com.pe/url?sa=t&url=https%3A%2F%2Fimageworkindia.com
maps.google.ae/url?sa=t&url=https%3A%2F%2Fimageworkindia.com
images.google.ae/url?sa=t&url=https%3A%2F%2Fimageworkindia.com
google.ae/url?sa=t&url=https%3A%2F%2Fimageworkindia.com
images.google.com.co/url?sa=t&url=https%3A%2F%2Fimageworkindia.com
maps.google.com.co/url?sa=t&url=https%3A%2F%2Fimageworkindia.com
google.com.co/url?sa=t&url=https%3A%2F%2Fimageworkindia.com
google.com.eg/url?sa=t&url=https%3A%2F%2Fimageworkindia.com
maps.google.com.eg/url?sa=t&url=https%3A%2F%2Fimageworkindia.com
images.google.com.eg/url?sa=t&url=https%3A%2F%2Fimageworkindia.com
images.google.lt/url?sa=t&url=https%3A%2F%2Fimageworkindia.com
google.lt/url?sa=t&url=https%3A%2F%2Fimageworkindia.com
maps.google.lt/url?sa=t&url=https%3A%2F%2Fimageworkindia.com
images.google.com.sa/url?sa=t&url=https%3A%2F%2Fimageworkindia.com
maps.google.com.sa/url?sa=t&url=https%3A%2F%2Fimageworkindia.com
google.com.sa/url?sa=t&url=https%3A%2F%2Fimageworkindia.com
images.google.rs/url?sa=t&url=https%3A%2F%2Fimageworkindia.com
google.si/url?sa=t&url=https%3A%2F%2Fimageworkindia.com
maps.google.si/url?sa=t&url=https%3A%2F%2Fimageworkindia.com
images.google.si/url?sa=t&url=https%3A%2F%2Fimageworkindia.com
images.google.by/url?sa=t&url=https%3A%2F%2Fimageworkindia.com
google.by/url?sa=t&url=https%3A%2F%2Fimageworkindia.com
maps.google.by/url?sa=t&url=https%3A%2F%2Fimageworkindia.com
images.google.co.ma/url?q=httpss%3A%2F%2Fimageworkindia.com%2F
images.google.com.ec/url?sa=t&url=https%3A%2F%2Fimageworkindia.com
google.com.ec/url?sa=t&url=https%3A%2F%2Fimageworkindia.com
maps.google.com.ec/url?sa=t&url=https%3A%2F%2Fimageworkindia.com
maps.google.lv/url?sa=t&url=https%3A%2F%2Fimageworkindia.com
google.lv/url?sa=t&url=https%3A%2F%2Fimageworkindia.com
images.google.lv/url?sa=t&url=https%3A%2F%2Fimageworkindia.com
images.google.com.cu/url?q=httpss%3A%2F%2Fimageworkindia.com%2F
maps.google.com.cu/url?q=httpss%3A%2F%2Fimageworkindia.com%2F
images.google.com.pr/url?sa=t&url=https%3A%2F%2Fimageworkindia.com
maps.google.com.pr/url?sa=t&url=https%3A%2F%2Fimageworkindia.com
google.com.pr/url?sa=t&url=https%3A%2F%2Fimageworkindia.com
images.google.com.gt/url?sa=t&url=https%3A%2F%2Fimageworkindia.com
google.com.gt/url?sa=t&url=https%3A%2F%2Fimageworkindia.com
maps.google.com.gt/url?sa=t&url=https%3A%2F%2Fimageworkindia.com
images.google.co.cr/url?sa=t&url=https%3A%2F%2Fimageworkindia.com
google.co.cr/url?sa=t&url=https%3A%2F%2Fimageworkindia.com
maps.google.co.cr/url?sa=t&url=https%3A%2F%2Fimageworkindia.com
google.com.uy/url?sa=t&url=https%3A%2F%2Fimageworkindia.com
images.google.com.uy/url?sa=t&url=https%3A%2F%2Fimageworkindia.com
maps.google.com.uy/url?sa=t&url=https%3A%2F%2Fimageworkindia.com
maps.google.lu/url?sa=t&url=https%3A%2F%2Fimageworkindia.com
images.google.lu/url?sa=t&url=https%3A%2F%2Fimageworkindia.com
google.lu/url?sa=t&url=https%3A%2F%2Fimageworkindia.com
maps.google.co.ke/url?sa=t&url=https%3A%2F%2Fimageworkindia.com
google.co.ke/url?sa=t&url=https%3A%2F%2Fimageworkindia.com
images.google.co.ke/url?sa=t&url=https%3A%2F%2Fimageworkindia.com
images.google.com.do/url?sa=t&url=https%3A%2F%2Fimageworkindia.com
maps.google.com.do/url?sa=t&url=https%3A%2F%2Fimageworkindia.com
google.com.do/url?sa=t&url=https%3A%2F%2Fimageworkindia.com
google.co.ma/url?sa=t&url=https%3A%2F%2Fimageworkindia.com
images.google.co.ma/url?sa=t&url=https%3A%2F%2Fimageworkindia.com
images.google.pt/url?sa=t&url=httpss%3A%2F%2Fimageworkindia.com
images.google.co.za/url?sa=t&url=httpss%3A%2F%2Fimageworkindia.com
maps.google.co.za/url?sa=t&url=httpss%3A%2F%2Fimageworkindia.com
images.google.com.sg/url?sa=t&url=httpss%3A%2F%2Fimageworkindia.com
images.google.co.il/url?sa=t&url=httpss%3A%2F%2Fimageworkindia.com
images.google.cl/url?sa=t&url=httpss%3A%2F%2Fimageworkindia.com
maps.google.ie/url?sa=t&url=httpss%3A%2F%2Fimageworkindia.com
images.google.bg/url?sa=t&url=httpss%3A%2F%2Fimageworkindia.com
maps.google.bg/url?sa=t&url=httpss%3A%2F%2Fimageworkindia.com
images.google.com.pe/url?sa=t&url=httpss%3A%2F%2Fimageworkindia.com
images.google.com.sa/url?sa=t&url=httpss%3A%2F%2Fimageworkindia.com
maps.google.com.sa/url?sa=t&url=httpss%3A%2F%2Fimageworkindia.com
images.google.hr/url?sa=t&url=httpss%3A%2F%2Fimageworkindia.com
maps.google.hr/url?sa=t&url=httpss%3A%2F%2Fimageworkindia.com
images.google.com.ec/url?sa=t&url=httpss%3A%2F%2Fimageworkindia.com
maps.google.com.do/url?sa=t&url=httpss%3A%2F%2Fimageworkindia.com
https://bit.ly/3aHbbJc
You can utilize the Refine Edges Tool to save time when managing foundation changes on pictures with loads of inconspicuous edges, similar to hair or mists in a sky.
Related: How to Change the Sky Color in Photoshop CC18
Maybe than removing every individual area, Photoshop will survey the distinction in tones and draw an unpleasant blueprint dependent on what it considers to be foundation and forefront.
For the instructional exercise on the most proficient method to eliminate hair from white foundation above, we utilized the Tolerance Setting and Background Eraser Tool since we needed to physically set how much shading we needed to have the option to alter, as opposed to allowing Photoshop to decide the distinction in colors. The Refine Tool functions admirably for nature shots (leaves on a sky foundation, for instance).
Where Is the Refine Edge Tool in Photoshop CC18?
To discover the Refine Edge Tool in Photoshop CC18, hold CTRL+ALT+R (CMD+OPT+R on Mac). On the other hand, go to the Select menu and snap Refine Edge to open the tool compartment.


0 comments:
Post a Comment