


Skin Retouching Photoshop Tutorial: Enhancing Ecommerce Photos
BECKY KILIMNIK
January 21, 2019
One of Photoshop's most regular uses is to correct a model's face or skin in a photograph. Nonetheless, correcting skin without making a face look phony or "plasticky" is no simple accomplishment.
Get free internet business and item photography tips
Email address
Buy in
In the accompanying Photoshop CC 2019 skin modifying instructional exercise, we'll go more than a few stages you can apply to any face to smooth wrinkles and pores, eliminate flaws, redness, and stray hairs, and shape a face to seem more slender. Figure out how to roll out unpretentious improvements so you can correct skin in Photoshop while holding the model's exceptional qualities.
In this skin correcting Photoshop instructional exercise:
Step by step instructions to fix flaws in Photoshop
Step by step instructions to smooth skin and edges in Photoshop
Step by step instructions to refine lines in Photoshop
Step by step instructions to make faces more slender (or more extensive) in Photoshop
Your last picture
The most effective method to fix flaws in Photoshop
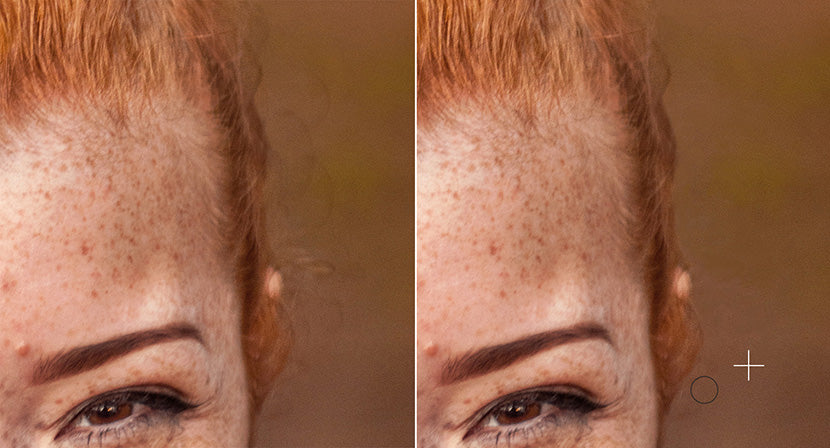
You can eliminate redness around the nose/eyes and accidental rosy cheeks rapidly and effectively from a model's face without influencing other red territories in your photograph, similar to lipstick or attire. Since this progression influences territories all through your picture, you'll need to do this progression before you modify some other spaces of your picture.
Stage 1: Set up your layers
In your Layers board, copy your Background layer and rename it to "redness amendment."
To copy a layer, right-click (CTRL+Click on a Mac) on your layer and select Duplicate Layer, or snap on the Layer board menu and select Duplicate Layer.
New to layers? Learn all you require to know in this current amateur's guide
Stage 2: Select shading range
In the dropdown menu at the highest point of the application window, pick Select > Color Range.
In the discourse box that shows up, ensure the radio catch close to Selection is picked at the lower part of the case, and select the eyedropper instrument on the right-hand side of the exchange box. Snap on a space of redness on the face inside the actual picture (you may have to move the discourse box far removed to get to the picture). Generally, the tip of the nose is an incredible spot to begin.
Pick the eyedropper device with the + image to add to the determination, tapping on pieces of the face that additionally need consideration — this may be the territories around the eyes or tip of the jaw. Push the fluffiness slider toward the left if the determination territory looks excessively enormous.
Snap OK.

Stage 3: Feather the choice
Pick Select > Modify > Feather from the dropdown menu and set your plume sweep to a low number, like 5 pixels.

Stage 4: Adjust tint of determination
Pick Image > Adjust > Hue/Saturation (or snap CTRL+U on a PC, COMMAND+U on a Mac) from the dropdown menu and move the Hue slider to one side until the redness is decreased, yet the change stays inconspicuous. Here, we moved the slider just to +5; your number will probably be somewhere in the range of +2 and +8.

Leave the Saturation and Lightness sliders at 0.
Snap OK.
Step by step instructions to smooth skin and edges in Photoshop
The subsequent stage in the skin correcting Photoshop instructional exercise is to eliminate flaws, smooth out stray hairs, and mollify wrinkles.
Keep in mind, while doing Photoshop face modifying, a definitive objective is to keep the model looking practical, so we would prefer not to wipe out ALL wrinkles. We likewise need to keep the entirety of the face's highlights set up; spots and dimples, for example, need to remain where they are.
This stage in the process is by a wide margin the most tedious, and will require your imaginative eye. It's additionally the least demanding advance to wreck, so we'll keep the entirety of our changes in a different layer that you can delete or cover up without influencing your Redness Correction layer.
For this progression, we'll utilize a blend of the Clone Stamp apparatus and the Healing Brush device. Both of these instruments work by choosing a space of the picture that you need to make a choice from, and afterward "painting" over the imperfection, wrinkle, or stray hair with the chose segment of the picture.
Figure out how to utilize other Photoshop devices to make your online business photographs sparkle.
Stage 1: Create another layer
Make a vacant layer over your Redness Correction layer and name it "spot adjustment."
Stage 2: Fix the enormous stuff

Start enormous and work your way in.
To begin with, select the Clone Stamp device from the Toolbar and set your hardness to 30% or lower. Set the haziness to somewhere in the range of 40% and half, and ensure the example is set to Current and Below.

To utilize the Clone Stamp device (and the Healing Brush apparatus), discover a space of the picture you need to address, and afterward move your cursor to a close by territory that is a similar shading yet smooth in surface.
Hold down the ALT key (OPTION on a Mac). The cursor will change shape. With the ALT (OPTION) key actually squeezed, click on the picture. Delivery the ALT (OPTION) key and "paint" with the instrument on the space you need to address.

As you utilize the Clone Stamp device (and the Healing Brush device), make sure to pick choices that are exceptionally near the space you're attempting to fix, to guarantee perfection (and trustworthiness) with your tones and surfaces.
Work on streamlining stray hairs and flyaways around the head first. As you work, make sure to keep the hair looking common; the last thing you need is for the head of hair to begin resembling a cap.
Then, move to the face, and cautiously utilize the Clone Stamp instrument to eliminate any pimples and stray hairs, and fix cosmetics if vital. As you work, you can change the size of your brush on a case by case basis, contingent upon the space you are chipping away at.
Stage 3: Smooth out scarcely discernible differences and subtleties
At last, pick the Healing Brush apparatus and work on any wrinkles. Start at the furthest edges of wrinkles and work your way in, utilizing an exceptionally delicate Healing Brush and making an effort not to eliminate wrinkles totally.
At the point when you zoom out and see your picture all in all, you may not notification every one of the individual changes you made on the double. Eventually, they'll amount to upgrade the general appearance.
Step by step instructions to refine lines in Photoshop
The following phase of the skin modifying measure is the most straightforward and fastest, and includes some extravagant layer medicines.
Stage 1: Prepare your layers
You'll have to stamp the redness amendment layer and the spot remedy layer into another layer while holding our unique foundation layer.
Select the two amendment layers and stamp them by composing CTRL+A+E (COMMAND+OPTION+E on a Mac).
Copy the new stepped layer multiple times. Name the lower copied layer Blur and the upper copied layer Texture.
Snap the eye symbol close to the Texture layer to make that layer imperceptible. Select the Blur layer.
Stage 2: Apply obscure
Pick Filter > Blur > Gaussian Blur from the dropdown menu.
In the discourse box, change the haze until you can presently don't perceive any of the model's pores. This will generally be somewhere in the range of 1.0 and 3.5, contingent upon the clearness and goal of your picture.
Snap OK.
Stage 3: Apply surface
Snap on the eye symbol close to the Texture layer to make the layer apparent once more. Select the Texture layer.
Pick Image > Apply Image from the dropdown menu.
In the exchange box, set your Layer to Blur, Channel to RGB, Blending to Add, Opacity to 100%, and Scale to 2. Additionally, check the container close to Invert. You should in any case be in the Texture layer when you do the entirety of this. The Texture layer will get dark with traces of subtleties.
Snap OK.
At last, change the mix method of your Texture layer to Linear Light.
Stage 4: Mask out subtleties
You should in any case be in the Texture layer now. While holding the ALT key (OPT on a Mac), click on the cover symbol at the lower part of the Layers board. This will make a veil with the whole picture covered out.
Ensure your veil is chosen (you should see a halfway white blueprint around the cover symbol inside the layer, as in the picture above).
In your Toolbar, set your frontal area tone to white and your experience tone to dark.
Pick your Brush apparatus from the Toolbar and change its settings with the goal that it is exceptionally delicate (30% hardness or lower), and its haziness is around 40%.
"Paint" in the space of your picture where you need to bring back in subtleties, for example, around the eyes, eyebrows, lips, teeth, edges of the nose, and everything around the face, including hair, garments, and foundation.
Stage 5: Make any acclimations to Blur layer
At this stage, you'll have the option to check whether there are any spaces of the model's skin that actually need changes after spot adjustment and obscuring. You can utilize similar instruments and methods you utilized in the Spot Correction layer to adjust the Blur layer.
The most effective method to make faces more slender (or more extensive) in Photoshop
The following
images.google.fr/url?sa=t&url=https%3A%2F%2Fimageworkindia.com
maps.google.fr/url?sa=t&url=https%3A%2F%2Fimageworkindia.com
maps.google.es/url?sa=t&url=https%3A%2F%2Fimageworkindia.com
images.google.es/url?sa=t&url=https%3A%2F%2Fimageworkindia.com
google.es/url?sa=t&url=https%3A%2F%2Fimageworkindia.com
images.google.it/url?sa=t&url=https%3A%2F%2Fimageworkindia.com
google.it/url?sa=t&url=https%3A%2F%2Fimageworkindia.com
maps.google.it/url?sa=t&url=https%3A%2F%2Fimageworkindia.com
images.google.com.br/url?sa=t&url=https%3A%2F%2Fimageworkindia.com
google.com.br/url?sa=t&url=https%3A%2F%2Fimageworkindia.com
maps.google.com.br/url?sa=t&url=https%3A%2F%2Fimageworkindia.com
maps.google.ca/url?sa=t&url=https%3A%2F%2Fimageworkindia.com
images.google.ca/url?sa=t&url=https%3A%2F%2Fimageworkindia.com
google.ca/url?sa=t&url=https%3A%2F%2Fimageworkindia.com
images.google.com.hk/url?sa=t&url=https%3A%2F%2Fimageworkindia.com
google.com.hk/url?sa=t&url=https%3A%2F%2Fimageworkindia.com
maps.google.com.hk/url?sa=t&url=https%3A%2F%2Fimageworkindia.com
google.nl/url?sa=t&url=https%3A%2F%2Fimageworkindia.com
maps.google.nl/url?sa=t&url=https%3A%2F%2Fimageworkindia.com
images.google.nl/url?sa=t&url=https%3A%2F%2Fimageworkindia.com
maps.google.co.in/url?sa=t&url=https%3A%2F%2Fimageworkindia.com
images.google.co.in/url?sa=t&url=https%3A%2F%2Fimageworkindia.com
google.co.in/url?sa=t&url=https%3A%2F%2Fimageworkindia.com
maps.google.no/url?q=httpss%3A%2F%2Fimageworkindia.com%2F
images.google.no/url?q=httpss%3A%2F%2Fimageworkindia.com%2F
images.google.co.th/url?sa=t&url=https%3A%2F%2Fimageworkindia.com
maps.google.co.th/url?sa=t&url=https%3A%2F%2Fimageworkindia.com
google.co.th/url?sa=t&url=https%3A%2F%2Fimageworkindia.com
images.google.com.ua/url?sa=t&url=https%3A%2F%2Fimageworkindia.com
maps.google.com.ua/url?sa=t&url=https%3A%2F%2Fimageworkindia.com
google.com.ua/url?sa=t&url=https%3A%2F%2Fimageworkindia.com
google.com.tr/url?sa=t&url=https%3A%2F%2Fimageworkindia.com
maps.google.com.tr/url?sa=t&url=https%3A%2F%2Fimageworkindia.com
images.google.com.tr/url?sa=t&url=https%3A%2F%2Fimageworkindia.com
images.google.com.co/url?q=httpss%3A%2F%2Fimageworkindia.com%2F
maps.google.com.co/url?q=httpss%3A%2F%2Fimageworkindia.com%2F
google.com.co/url?q=httpss%3A%2F%2Fimageworkindia.com%2F
images.google.sk/url?q=httpss%3A%2F%2Fimageworkindia.com%2F
maps.google.com.mx/url?sa=t&url=https%3A%2F%2Fimageworkindia.com
google.com.mx/url?sa=t&url=https%3A%2F%2Fimageworkindia.com
images.google.com.mx/url?sa=t&url=https%3A%2F%2Fimageworkindia.com
google.dk/url?sa=t&url=https%3A%2F%2Fimageworkindia.com
images.google.dk/url?sa=t&url=https%3A%2F%2Fimageworkindia.com
images.google.no/url?sa=t&url=https%3A%2F%2Fimageworkindia.com
maps.google.co.il/url?sa=t&url=https%3A%2F%2Fimageworkindia.com
images.google.co.il/url?sa=t&url=https%3A%2F%2Fimageworkindia.com
google.co.il/url?sa=t&url=https%3A%2F%2Fimageworkindia.com
images.google.com.sa/url?q=httpss%3A%2F%2Fimageworkindia.com%2F
google.com.sa/url?q=httpss%3A%2F%2Fimageworkindia.com%2F
google.cl/url?sa=t&url=https%3A%2F%2Fimageworkindia.com
images.google.cl/url?sa=t&url=https%3A%2F%2Fimageworkindia.com
maps.google.cl/url?sa=t&url=https%3A%2F%2Fimageworkindia.com
maps.google.ie/url?sa=t&url=https%3A%2F%2Fimageworkindia.com
google.ie/url?sa=t&url=https%3A%2F%2Fimageworkindia.com
images.google.ie/url?sa=t&url=https%3A%2F%2Fimageworkindia.com
google.sk/url?sa=t&url=https%3A%2F%2Fimageworkindia.com
maps.google.sk/url?sa=t&url=https%3A%2F%2Fimageworkindia.com
images.google.sk/url?sa=t&url=https%3A%2F%2Fimageworkindia.com
maps.google.lt/url?sa=t&url=https%3A%2F%2Fimageworkindia.com
images.google.com.sa/url?sa=t&url=https%3A%2F%2Fimageworkindia.com
maps.google.com.sa/url?sa=t&url=https%3A%2F%2Fimageworkindia.com
google.com.sa/url?sa=t&url=https%3A%2F%2Fimageworkindia.com
images.google.hr/url?sa=t&url=https%3A%2F%2Fimageworkindia.com
google.hr/url?sa=t&url=https%3A%2F%2Fimageworkindia.com
maps.google.hr/url?sa=t&url=https%3A%2F%2Fimageworkindia.com
google.co.ve/url?sa=t&url=https%3A%2F%2Fimageworkindia.com
maps.google.co.ve/url?sa=t&url=https%3A%2F%2Fimageworkindia.com
images.google.co.ve/url?sa=t&url=https%3A%2F%2Fimageworkindia.com
google.ee/url?sa=t&url=https%3A%2F%2Fimageworkindia.com
maps.google.ee/url?sa=t&url=https%3A%2F%2Fimageworkindia.com
images.google.ee/url?sa=t&url=https%3A%2F%2Fimageworkindia.com
google.com.pk/url?sa=t&url=https%3A%2F%2Fimageworkindia.com
images.google.com.pk/url?sa=t&url=https%3A%2F%2Fimageworkindia.com
google.rs/url?sa=t&url=https%3A%2F%2Fimageworkindia.com
maps.google.rs/url?sa=t&url=https%3A%2F%2Fimageworkindia.com
images.google.rs/url?sa=t&url=https%3A%2F%2Fimageworkindia.com
google.si/url?sa=t&url=https%3A%2F%2Fimageworkindia.com
maps.google.si/url?sa=t&url=https%3A%2F%2Fimageworkindia.com
images.google.si/url?sa=t&url=https%3A%2F%2Fimageworkindia.com
maps.google.co.ke/url?sa=t&url=https%3A%2F%2Fimageworkindia.com
google.co.ke/url?sa=t&url=https%3A%2F%2Fimageworkindia.com
images.google.co.ke/url?sa=t&url=https%3A%2F%2Fimageworkindia.com
images.google.com.do/url?sa=t&url=https%3A%2F%2Fimageworkindia.com
maps.google.com.do/url?sa=t&url=https%3A%2F%2Fimageworkindia.com
google.com.do/url?sa=t&url=https%3A%2F%2Fimageworkindia.com
google.co.ma/url?sa=t&url=https%3A%2F%2Fimageworkindia.com
images.google.co.ma/url?sa=t&url=https%3A%2F%2Fimageworkindia.com
maps.google.lk/url?sa=t&url=https%3A%2F%2Fimageworkindia.com
google.lk/url?sa=t&url=https%3A%2F%2Fimageworkindia.com
images.google.lk/url?sa=t&url=https%3A%2F%2Fimageworkindia.com
images.google.com.cu/url?sa=t&url=https%3A%2F%2Fimageworkindia.com
google.com.cu/url?sa=t&url=https%3A%2F%2Fimageworkindia.com
maps.google.com.cu/url?sa=t&url=https%3A%2F%2Fimageworkindia.com
images.google.co.bw/url?sa=t&url=https%3A%2F%2Fimageworkindia.com
google.co.bw/url?sa=t&url=https%3A%2F%2Fimageworkindia.com
maps.google.co.bw/url?sa=t&url=https%3A%2F%2Fimageworkindia.com
images.google.co.uk/url?sa=t&url=httpss%3A%2F%2Fimageworkindia.com
maps.google.co.uk/url?sa=t&url=httpss%3A%2F%2Fimageworkindia.com
maps.google.co.za/url?sa=t&url=httpss%3A%2F%2Fimageworkindia.com
images.google.com.sg/url?sa=t&url=httpss%3A%2F%2Fimageworkindia.com
images.google.co.il/url?sa=t&url=httpss%3A%2F%2Fimageworkindia.com
images.google.cl/url?sa=t&url=httpss%3A%2F%2Fimageworkindia.com
maps.google.ie/url?sa=t&url=httpss%3A%2F%2Fimageworkindia.com
images.google.bg/url?sa=t&url=httpss%3A%2F%2Fimageworkindia.com
maps.google.bg/url?sa=t&url=httpss%3A%2F%2Fimageworkindia.com
images.google.com.pe/url?sa=t&url=httpss%3A%2F%2Fimageworkindia.com
images.google.com.sa/url?sa=t&url=httpss%3A%2F%2Fimageworkindia.com
maps.google.com.sa/url?sa=t&url=httpss%3A%2F%2Fimageworkindia.com
images.google.hr/url?sa=t&url=httpss%3A%2F%2Fimageworkindia.com
maps.google.hr/url?sa=t&url=httpss%3A%2F%2Fimageworkindia.com
images.google.com.ec/url?sa=t&url=httpss%3A%2F%2Fimageworkindia.com
maps.google.com.do/url?sa=t&url=httpss%3A%2F%2Fimageworkindia.com
and last advance in this skin correcting Photoshop instructional exercise will permit you to add or eliminate shadows and features. Deliberately adding shadows permits you to make the face, or explicit highlights, seem more slender. Adding features can help characterize certain pieces of the face, for example, cheekbones and the region just underneath the eyebrow.
Find out about drop shadow picture altering administrations at Path.
You can likewise eliminate existing shadows and features to mellow the skin further and fix little lighting issues. Both adding and eliminating concealing are done likewise way, simultaneously.
Stage 1: Set up your new layer
Make another, vacant layer over your Texture layer. Name the layer "forming."
Fill the forming layer with half dark by picking Edit > Fill from the dropdown menu, or by composing SHIFT+F5 (FN+SHIFT+F5 on a Mac) and picking half Gray close to Contents.
Snap OK.
Change the Contouring layer's mix mode to Soft Light.
Stage 2: Darken explicit territories
Select your Burn device from the Toolbar. Set the apparatus' settings to 40% mistiness, and ensure the Range is set to Midtones. Change the size of the brush to something rather enormous.
Utilizing the Burn device inside the shaping layer, "paint" the sides of the face and the edge of the jawline to thin the face. On the off chance that you need to shape the nose too, paint the sides of the nose


0 comments:
Post a Comment